ShardingSphere
- ShardingSphere-JDBC
- ShardingSphere-Proxy
- ShardingSphere-Sidecar(TODO)
1 分库分表概述
阿里巴巴开发手册:单表行数超过 500 万行或者单表容量超过 2GB,才推荐进行分库分表。
说明:如果预计三年后的数据量根本达不到这个级别,请不要在创建表时就分库分表。
1.1 什么是分库分表
数据量不可控的,随着时间和业务发展,造成表里面数据越来越多,如果再去对数据库表 curd 操作时候,造成性能问题。
对于问题的解决有两种方案:
- 方案 1:提升硬件条件(成本过高)
- 方案 2:分库分表
1.2 分库分表的方式
垂直切分
垂直切分有垂直分表和垂直分库
对于垂直分表:
操作数据库中某张表,把这张表中一部分字段数据存到一张新表里面,再把这张表另一部分字段数据存到另外一张表里面。
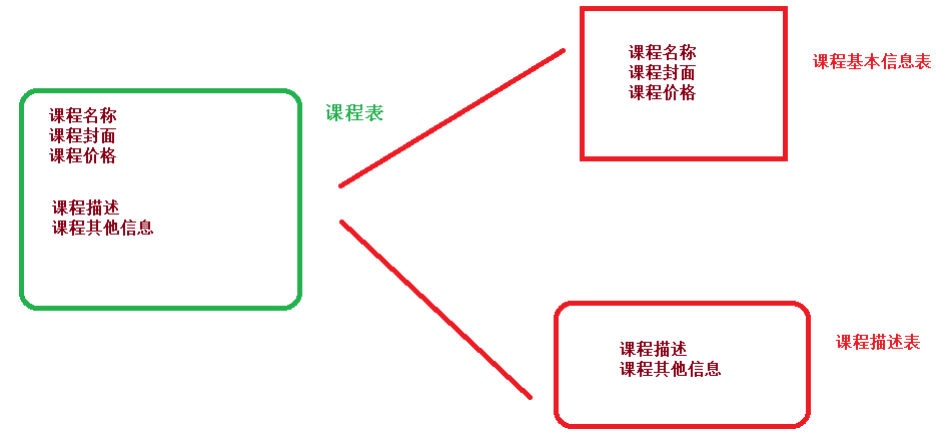
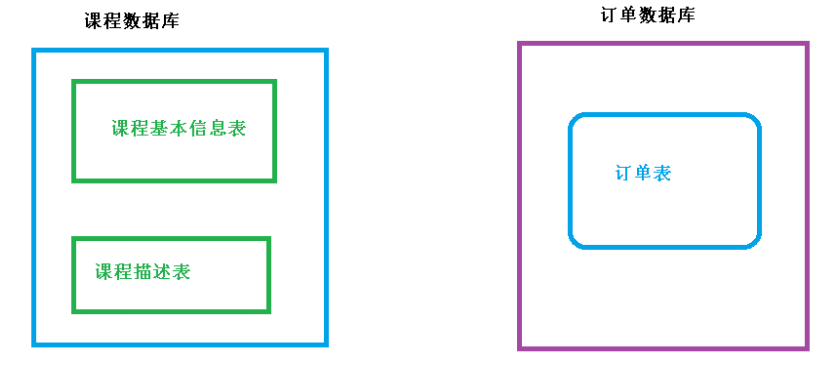
对于垂直分库:把单一数据库按照业务进行划分,专库专表。
水平切分
水平切分有水平分表和水平分库
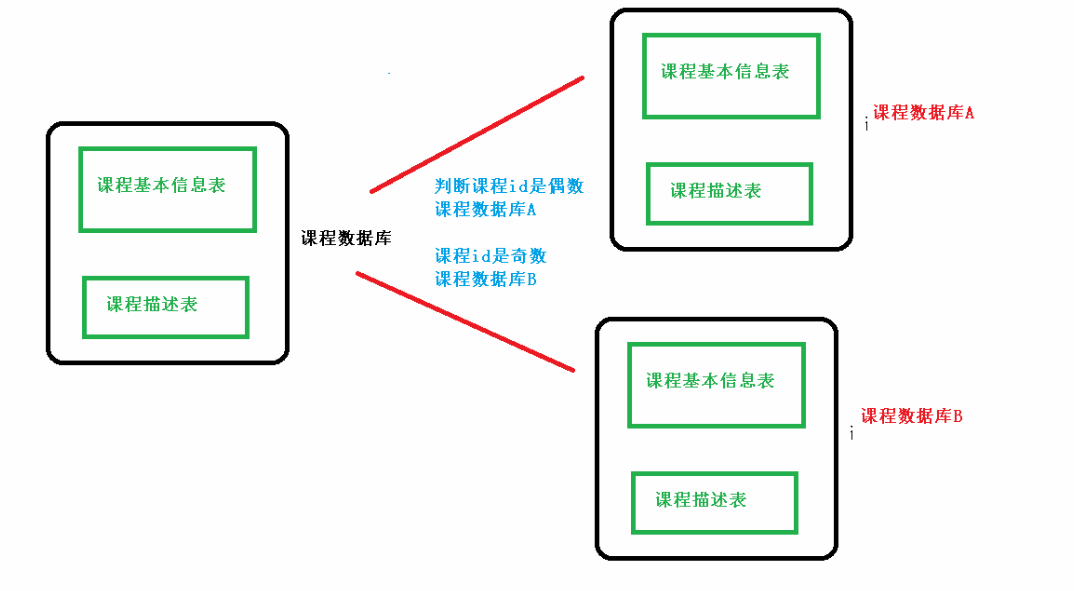
对于水平分库:创建相同结构的数据库
数据的插入可以根据id来插入。
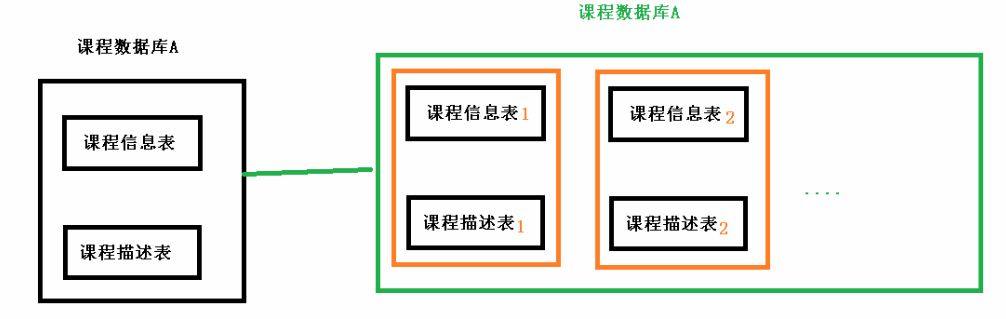
对于水平分表:可以把一个表的数据(按数据行)分到多个同一个数据库的多张表中,每个表只有这个表的部分数据,这样做能小幅提升性能,它仅仅作为水平分库的一个补充优化。
总结:
- 垂直拆分,水平复制
- 一般来说,在系统设计阶段就应该根据业务耦合松紧来确定垂直分库,垂直分表方案,在数据量及访问压力不是特别大的情况,首先考虑缓存、读写分离、索引技术等方案。若数据量极大,且持续增长,再考虑水平分库水平分表方案。
1.3 分库分表应用和问题
1.应用
2.分库分表问题
跨节点连接查询问题(分页、排序)
多数据源管理问题
2 ShardingSphere概述
Apache ShardingSphere 是一款关系型数据库中间件,旨在充分合理地在分布式的场景下利用关系型数据库的计算和存储能力,而并非实现一个全新的关系型数据库。
ShardingSphere 有三个产品:ShardingSphere-JDBC,ShardingSphere-Proxy和ShardingSphere-Sidecar(TODO)
官方文档:https://shardingsphere.apache.org/document/current/cn/overview/
3 ShardingSphere入门
3.1 sharding-jdbc
3.1.1 概述
一个轻量级的Java 框架,在 Java 的 JDBC 层提供的额外服务。 它使用客户端直连数据库,以 jar 包形式提供服务,无需额外部署和依赖,可理解为增强版的 JDBC 驱动,完全兼容 JDBC 和各种 ORM 框架。
主要功能:数据分片和读写分离
主要目的:简化对分库分表之后数据相关操作
3.1.2 环境搭建
(1)SpringBoot+MyBatisPlus+Sharding-JDBC+Druid连接池 搭建环境
(2)创建SpringBoot项目
(3)引入pom依赖
1
2
3
4
5
6
7
8
9
10
11
12
13
14
15
16
17
18
19
20
21
22
23
24
25
26
27
28
29
30
31
32
33
34
35
36
37
38
39
40
41
42
43
44
45
46
47
48
49
50
51
52
53
54
55
56
57
58
59
60
61
62
63
64
65
66
67
68
69
70
71
72
73
74
75
| <?xml version="1.0" encoding="UTF-8"?>
<project xmlns="http://maven.apache.org/POM/4.0.0" xmlns:xsi="http://www.w3.org/2001/XMLSchema-instance"
xsi:schemaLocation="http://maven.apache.org/POM/4.0.0 https://maven.apache.org/xsd/maven-4.0.0.xsd">
<modelVersion>4.0.0</modelVersion>
<parent>
<groupId>org.springframework.boot</groupId>
<artifactId>spring-boot-starter-parent</artifactId>
<version>2.2.1.RELEASE</version>
<relativePath/>
</parent>
<groupId>com.liuurick</groupId>
<artifactId>shardingjdbcdemo</artifactId>
<version>0.0.1-SNAPSHOT</version>
<name>shardingjdbcdemo</name>
<description>Demo project for Spring Boot</description>
<properties>
<java.version>1.8</java.version>
<mybatis-plus-boot-starter.version>3.3.1</mybatis-plus-boot-starter.version>
<sharding-jdbc.version>4.0.0-RC1</sharding-jdbc.version>
<druid.version>1.1.20</druid.version>
<mysql-connector.version>5.1.49</mysql-connector.version>
</properties>
<dependencies>
<dependency>
<groupId>org.springframework.boot</groupId>
<artifactId>spring-boot-starter</artifactId>
</dependency>
<dependency>
<groupId>org.springframework.boot</groupId>
<artifactId>spring-boot-starter-test</artifactId>
</dependency>
<dependency>
<groupId>org.apache.shardingsphere</groupId>
<artifactId>sharding-jdbc-spring-boot-starter</artifactId>
<version>${sharding-jdbc.version}</version>
</dependency>
<dependency>
<groupId>com.alibaba</groupId>
<artifactId>druid-spring-boot-starter</artifactId>
<version>${druid.version}</version>
</dependency>
<dependency>
<groupId>mysql</groupId>
<artifactId>mysql-connector-java</artifactId>
<version>${mysql-connector.version}</version>
</dependency>
<dependency>
<groupId>com.baomidou</groupId>
<artifactId>mybatis-plus-boot-starter</artifactId>
<version>${mybatis-plus-boot-starter.version}</version>
</dependency>
<dependency>
<groupId>org.projectlombok</groupId>
<artifactId>lombok</artifactId>
</dependency>
</dependencies>
<build>
<plugins>
<plugin>
<groupId>org.springframework.boot</groupId>
<artifactId>spring-boot-maven-plugin</artifactId>
</plugin>
</plugins>
</build>
</project>
|
(4)建表
按照水平分表的方式,创建数据库和数据库表
创建数据库 course_db
在数据库创建两张表 course_1 和 course_2
约定规则:如果添加课程 id 是偶数把数据添加 course_1,如果奇数添加到 course_2
1
2
3
4
5
6
7
8
9
10
11
12
13
14
15
16
17
| create database course_db;
use course_db;
create table course_1 (
cid bigint(20) primary key ,
cname varchar(50) not null,
user_id bigint(20) not null ,
status varchar(10) not null
) engine = InnoDB;
create table course_2 (
cid bigint(20) primary key ,
cname varchar(50) not null,
user_id bigint(20) not null ,
status varchar(10) not null
) engine = InnoDB;
|
(5)编写代码实现对分库分表后数据的操作
3.1.3 Sharding-JDBC实现水平分表
官方文档:https://shardingsphere.apache.org/document/current/cn/user-manual/shardingsphere-jdbc/usage/sharding/spring-boot-starter/
1
2
3
4
5
6
7
8
9
10
11
12
13
14
15
16
17
18
19
20
21
22
23
24
25
26
27
|
spring.shardingsphere.datasource.names=m1
spring.main.allow-bean-definition-overriding=true
spring.shardingsphere.datasource.m1.type=com.alibaba.druid.pool.DruidDataSource
spring.shardingsphere.datasource.m1.driver-class-name=com.mysql.jdbc.Driver
spring.shardingsphere.datasource.m1.url=jdbc:mysql://localhost:3306/course_db
spring.shardingsphere.datasource.m1.username=root
spring.shardingsphere.datasource.m1.password=123456
spring.shardingsphere.sharding.tables.course.actual-data-nodes=m1.course_$->{1..2}
spring.shardingsphere.sharding.tables.course.key-generator.column=cid
spring.shardingsphere.sharding.tables.course.key-generator.type=SNOWFLAKE
spring.shardingsphere.sharding.tables.course.table-strategy.inline.sharding-column=cid
spring.shardingsphere.sharding.tables.course.table-strategy.inline.algorithm-expression=course_$->{cid % 2 + 1}
spring.shardingsphere.props.sql.show=true
|
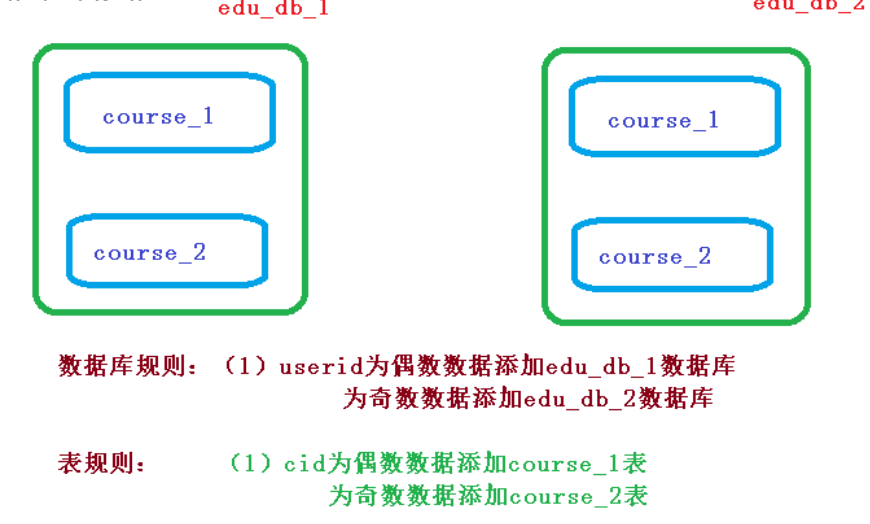
3.1.4 Sharding-JDBC 实现水平分库
1.需求分析
2.sql
1
2
3
4
5
6
7
8
9
10
11
12
13
14
15
16
17
18
19
20
21
22
23
24
25
26
27
28
29
30
31
32
33
34
| create database edu_db_1;
create database edu_db_2;
use edu_db_1;
create table course_1 (
`cid` bigint(20) primary key,
`cname` varchar(50) not null,
`user_id` bigint(20) not null,
`status` varchar(10) not null
);
create table course_2 (
`cid` bigint(20) primary key,
`cname` varchar(50) not null,
`user_id` bigint(20) not null,
`status` varchar(10) not null
);
use edu_db_2;
create table course_1 (
`cid` bigint(20) primary key,
`cname` varchar(50) not null,
`user_id` bigint(20) not null,
`status` varchar(10) not null
);
create table course_2 (
`cid` bigint(20) primary key,
`cname` varchar(50) not null,
`user_id` bigint(20) not null,
`status` varchar(10) not null
);
|
3.在 SpringBoot 配置文件配置数据库分片规则
1
2
3
4
5
6
7
8
9
10
11
12
13
14
15
16
17
18
19
20
21
22
23
24
25
26
27
28
29
30
31
32
33
34
35
36
37
38
39
40
41
42
43
44
|
spring.shardingsphere.datasource.names=m1,m2
spring.main.allow-bean-definition-overriding=true
spring.shardingsphere.datasource.m1.type=com.alibaba.druid.pool.DruidDataSource
spring.shardingsphere.datasource.m1.driver-class-name=com.mysql.cj.jdbc.Driver
spring.shardingsphere.datasource.m1.url=jdbc:mysql://localhost:3306/edu_db_1?serverTimezone=GMT%2B8
spring.shardingsphere.datasource.m1.username=root
spring.shardingsphere.datasource.m1.password=123456
spring.shardingsphere.datasource.m2.type=com.alibaba.druid.pool.DruidDataSource
spring.shardingsphere.datasource.m2.driver-class-name=com.mysql.cj.jdbc.Driver
spring.shardingsphere.datasource.m2.url=jdbc:mysql://localhost:3306/edu_db_2?serverTimezone=GMT%2B8
spring.shardingsphere.datasource.m2.username=root
spring.shardingsphere.datasource.m2.password=123456
spring.shardingsphere.sharding.tables.course.actual-data-nodes=m$->{1..2}.course_$->{1..2}
spring.shardingsphere.sharding.tables.course.key-generator.column=cid
spring.shardingsphere.sharding.tables.course.key-generator.type=SNOWFLAKE
spring.shardingsphere.sharding.tables.course.database-strategy.inline.sharding-column=user_id
spring.shardingsphere.sharding.tables.course.database-strategy.inline.algorithm-expression=m$->{user_id % 2 + 1}
spring.shardingsphere.sharding.tables.course.table-strategy.inline.sharding-column=cid
spring.shardingsphere.sharding.tables.course.table-strategy.inline.algorithm-expression=course_$->{cid % 2 + 1}
spring.shardingsphere.props.sql.show=true
|
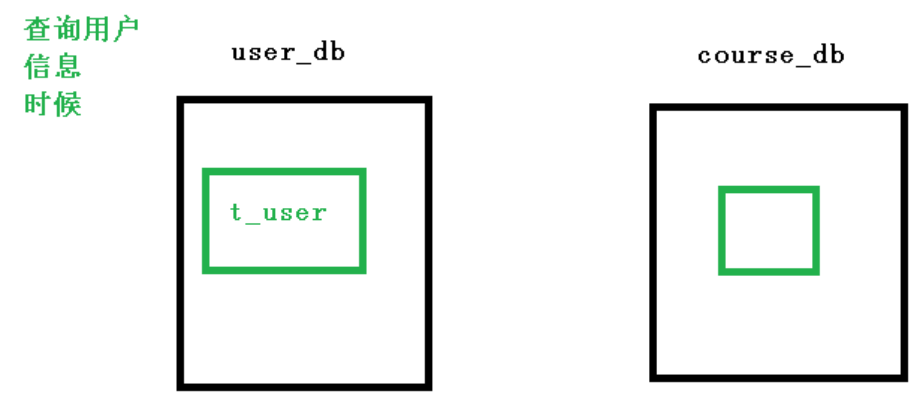
3.1.5 Sharding-JDBC 实现垂直分库
1.需求分析
2.sql
1
2
3
4
5
6
7
8
9
| create database user_db;
use user_db;
create table t_user(
`user_id` bigint(20) primary key,
`username` varchar(100) not null,
`status` varchar(50) not null
);
|
3.配置垂直分库策略
在 application.properties 进行配置
1
2
3
4
5
6
7
8
9
10
11
12
13
14
15
16
17
18
19
20
21
22
23
24
25
26
27
28
29
30
31
32
33
34
35
36
37
38
39
|
spring.shardingsphere.datasource.names=m1,m2,m0
spring.main.allow-bean-definition-overriding=true #配置第一个数据源具体内容,包含连接池,驱动,地址,用户名和密码
spring.shardingsphere.datasource.m1.type=com.alibaba.druid.pool.DruidDataSource
spring.shardingsphere.datasource.m1.driver-class-name=com.mysql.cj.jdbc.Driver
spring.shardingsphere.datasource.m1.url=jdbc:mysql://localhost:3306/edu_db_1?s
erverTimezone=GMT%2B8
spring.shardingsphere.datasource.m1.username=root
spring.shardingsphere.datasource.m1.password=root #配置第二个数据源具体内容,包含连接池,驱动,地址,用户名和密码
spring.shardingsphere.datasource.m2.type=com.alibaba.druid.pool.DruidDataSource
spring.shardingsphere.datasource.m2.driver-class-name=com.mysql.cj.jdbc.Driver
spring.shardingsphere.datasource.m2.url=jdbc:mysql://localhost:3306/edu_db_2?s
erverTimezone=GMT%2B8
spring.shardingsphere.datasource.m2.username=root
spring.shardingsphere.datasource.m2.password=root
spring.shardingsphere.datasource.m0.type=com.alibaba.druid.pool.DruidDataSource
spring.shardingsphere.datasource.m0.driver-class-name=com.mysql.cj.jdbc.Driver
spring.shardingsphere.datasource.m0.url=jdbc:mysql://localhost:3306/user_db?se
rverTimezone=GMT%2B8
spring.shardingsphere.datasource.m0.username=root
spring.shardingsphere.datasource.m0.password=root
spring.shardingsphere.sharding.tables.t_user.actual-data-nodes=m$->{0}.t_user
spring.shardingsphere.sharding.tables.t_user.key-generator.column=user_id
spring.shardingsphere.sharding.tables.t_user.key-generator.type=SNOWFLAKE
course_2 表
spring.shardingsphere.sharding.tables.t_user.table-strategy.inline.sharding�column=user_id
spring.shardingsphere.sharding.tables.t_user.table-strategy.inline.algorithm�expression=t_user
|
3.1.6 Sharding-JDBC 公共表
1.公共表
(1)存储固定数据的表,表数据很少发生变化,查询时候经常进行关联
(2)在每个数据库中创建出相同结构公共表
2.在多个数据库都创建相同结构公共表

3.在项目配置文件 application.properties 进行公共表配置
1
2
3
4
|
spring.shardingsphere.sharding.broadcast-tables=t_udict
spring.shardingsphere.sharding.tables.t_udict.key-generator.column=dictid
spring.shardingsphere.sharding.tables.t_udict.key-generator.type=SNOWFLAKE
|
3.1.7 Sharding-JDBC 实现读写分离
在业务场景中,数据库的读操作远远大于增,删,改操作,此时CRUD操作的分离是非常有必要的。
主从复制:当主服务器有写入(insert/update/delete)语句时候,从服务器自动获取。
读写分离:insert/update/delete语句操作一台服务器,select操作另一台服务器。
Sharding-JDBC 通过 sql 语句语义分析,实现读写分离过程,不会做数据同步。
1
2
3
4
5
6
7
8
9
10
11
12
13
14
15
16
17
|
spring.shardingsphere.datasource.s0.type=com.alibaba.druid.pool.DruidDataSource
spring.shardingsphere.datasource.s0.driver-class-name=com.mysql.cj.jdbc.Driver
spring.shardingsphere.datasource.s0.url=jdbc:mysql://localhost:3307/user_db?se
rverTimezone=GMT%2B8
spring.shardingsphere.datasource.s0.username=root
spring.shardingsphere.datasource.s0.password=root
spring.shardingsphere.sharding.master-slave-rules.ds0.master-data-source�name=m0
spring.shardingsphere.sharding.master-slave-rules.ds0.slave-data-source�names=s0
spring.shardingsphere.sharding.tables.t_user.actual-data-nodes=ds0.t_user
|
3.2 sharding-proxy
3.2.1 概述
官方文档:https://shardingsphere.apache.org/document/current/cn/user-manual/shardingsphere-proxy/
3.2.2 安装与配置
https://shardingsphere.apache.org/document/current/cn/user-manual/shardingsphere-proxy/
3.3 sharding-sidercar
ShardingSphere-Sidecar 是 ShardingSphere 的第三个产品,目前仍然在规划中。
ShardingSphere-Sidecar 的优势在于对 Kubernetes 和 Mesos 的云原生支持。